How to Add Counter to the Listing Grid and the Dynamic Table Widgets with the Listing Сounter Add-on in Elementor
This tutorial explains how to add numbers in listings or dynamic tables in Elementor using the listing counter callback created by the JetEngine plugin.
The JetEngine DevTools Listing Сounter Add-on for the JetEngine plugin adds numbers to the posts/CPTs in listings or dynamic tables, adding the listing counter callback to the Dynamic Field and Listing Grid widgets; it uses the custom queries and dynamic tables.
Downloading and Installing the Add-on
Downloading the add-on
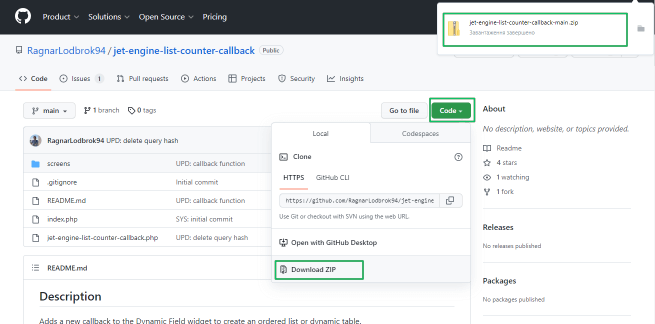
Download this add-on from GitHub for free via the jet-engine-list-counter-callback link; press the “Code” button and the Download Zip tab.
Installing the add-on
Go to the WordPress Dashboard, navigate to the Plugins tab, and press the “Add New” button to add the add-on.
This tutorial details How to install Jet plugins via WordPress Dashboard.
Activate the add-on.

Building a Query for the Numerated CPTs
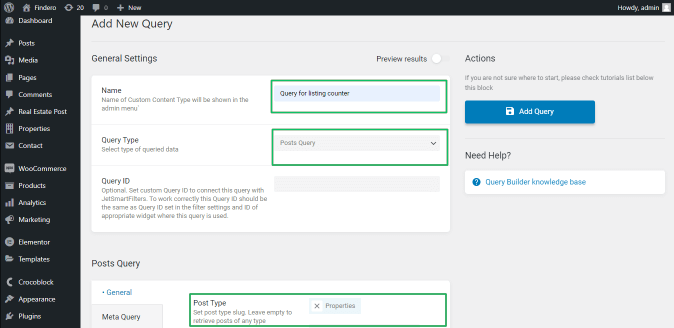
Navigate to JetEngine > QueryBuilder of the WordPress Dashboard. Press the “Add New” button to create a new query.
Type the query name in the Name field (here, Query for listing counter), choose the Posts Query option in the Query Type drop-down menu, and select the CPT for the listing or the dynamic table (here, Properties for the listings and Real Estate for the dynamic tables).
This tutorial explains How to Use Query Builder.
Adding Counters to Listings
Adding callbacks to dynamic fields
Open the Listing item with the dynamic fields to which you want to add numbers. Find the Dynamic Field widget and drag it to where you want to display numbers.
Enable the Filter field output toggle of this widget to activate the Callback and Select query drop-down menus. Select the appropriate settings: the Listing’s counter for the Callback and Query for listing counter for the Select query menu.
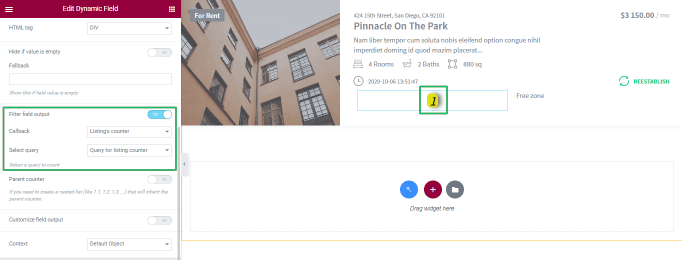
Additionally, users can apply stylish settings to the number.
Read about How to Work with Dynamic Field Widget in this tutorial.
Listing Grid widget settings
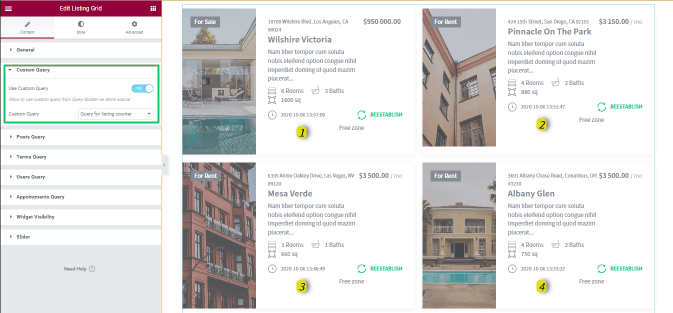
Open a page with the Listing Grid widget built on the CPTs with the counter in the Dynamic Field. Unroll the Custom Query tab of the Listing Grid widget. Move the Use Custom Query toggle and choose the previously created query (here, Query for listing counter) from the Select query drop-down menu.
Adding Counters to Dynamic Tables
Creation of a dynamic table
Navigate to JetEngine > Tables Builder of the WordPress Dashboard. Press the “Add New Table” button to create a new table.
Click the General Settings tab, type the table name in the Name field and choose the built query (here, Query for listing counter) with the CPT for the dynamic table from the Data Query drop-down menu.

Columns of the table
Click the Columns tab and add a column for the number displaying (here, index) with the following settings:
- move the Filter Column Output toggle;
- choose the Listings counter callback from the Filter Callback drop-down menu;
- choose the Query for listing counter from the Select query drop-down menu.
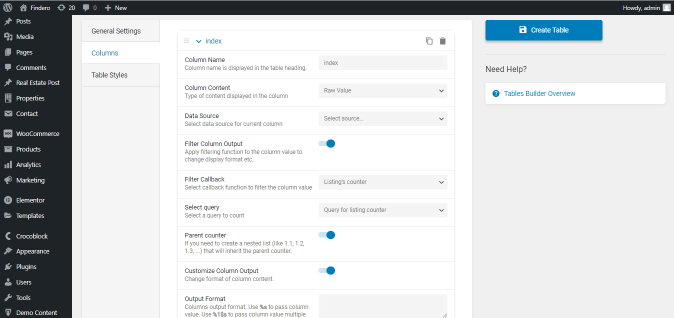
Users can display one or some dynamic fields from the CPT used for the build query as the columns: choose the Meta Field setting from the Data Source drop-down menu and the field from the Select Field drop-down menu.
To display the CPT as a whole, choose the Template settings from the Column Content drop-down menu as the type of content displayed in the column, and choose the necessary CPT from the Column template drop-down menu.
If necessary, unroll the Table Style tab and apply the stylish settings.
Press the “Create Table” button to create the table.
Read the Elementor Dynamic Table Creation Guide with details on dynamic table building.
Adding the table to a page
Open the page/post. Find the Dynamic Table widget and drop it down.
Choose the table built previously by the Tables Builder from the Table drop-down menu. Apply the stylish options you need.
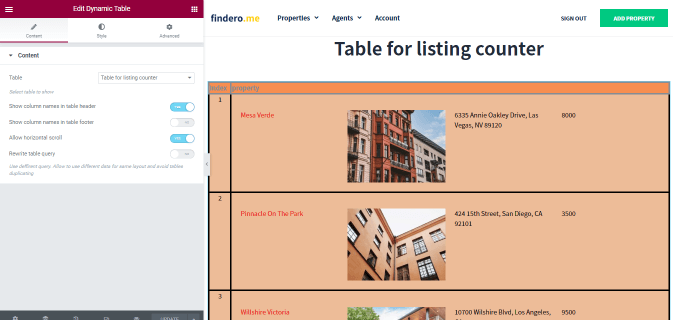
That’s all about the JetEngine DevTools Listing Сounter Add-on usage in Elementor.