Listing Grid Posts Query Overview
This tutorial describes all the features of the Listing Grid widget’s Posts Query settings section. You will learn to use all kinds of post queries to display only the items you need.
When you place the Listing Grid on the page, it shows all the items of a specific post type. However, you might need to show only the particular posts for different pages. Queries help you define the items shown in the grid on a certain page.
So, open the page where you have placed the Listing Grid widget in the Elementor page builder, click on it, and let’s go through the settings.
First Sight
There will be a few features when you unfold the Posts Query section.
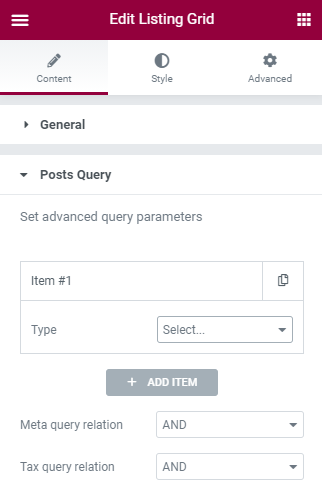
First of all, there will be a single item. Every query is added to the Listing Grid separately, but you can add as many as you need by clicking the “Add Item” button. You will be offered to choose the item’s Type from five variants: “Posts & Author Parameters,” “Order & Offset,” “Tax Query,” “Meta Query,” and “Date Query.” Each of them will be described further in this overview.
The other two features are Meta query relation and Tax query relation. If you have added several meta or tax query items, you can define how they work together here. AND means that all the added queries will perform at the same time. OR means that only one of the added queries that fit the case better will be active.
Posts & Author Parameters Query
This type of query allows you to filter the posts by their ID, relations, status, or author.
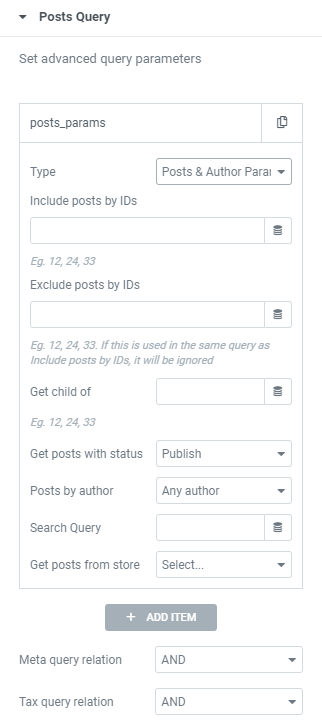
- Include posts by IDs — this feature allows you to choose what posts will be displayed in the grid. Type their ID numbers in the field, separated by commas, and they will be shown in the grid. Or press the “Dynamic Tags” button to display posts based on the specific parameter. For instance, related items;
- Exclude posts by IDs — if there are some posts that you don’t want to show in this particular grid, you can exclude them here. Put the ID numbers of the posts you want to get rid of into the field, and they will be excluded;
- Get child of — if you want to display child posts of a specific (one or many) parent post, then enter the IDs of the parent posts here;
- Get posts with status — this feature allows you to display in the grid only the posts of a chosen status, like “Publish” or “Private”;
- Posts by author — in this drop-down list, you can choose an author, and the grid will be displaying only that author’s posts;
- Search Query — if you need to show in the grid only those items that have a specific word in their title or description, this feature can help. Just type the word into the field;
- Get posts from store — this option allows you to show only the items that landed in a particular store. More details about this functionality can be found in this tutorial.
Order & Offset Query
If you want to add an offset to the grid items or place them in a specific order, this type of query will help you.
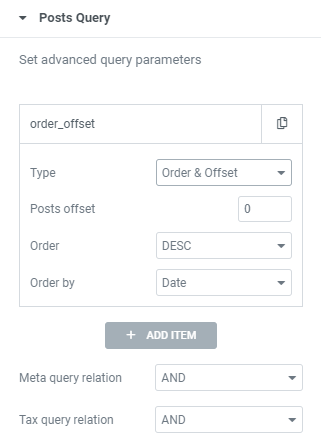
- Posts offset — the number you type in here is the number of posts that the grid will leave out once showing them. For example, if you type “1” in this field, the first post in the grid will be the second post of the posts list;
- Order — you can place the items in the ascending (ASC) or descending (DESC) order;
- Order by — it is also possible to sort the posts by values like ID or Date. This feature can be combined with the Order. For example, you can order the posts by date and then choose descending order.
“Order by” feature
Check the brief review of the available Order by options. Let’s assume you have selected the “ASC” option in the Order field.
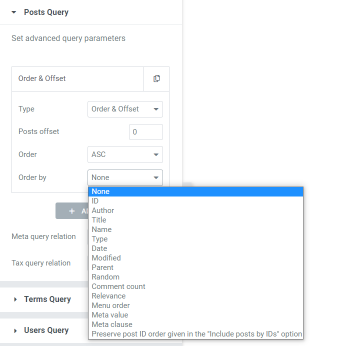
- ID — displays items according to their ID numbers. So, the post with the ID “1” will be displayed as the first one, the one with ID “2” will be the second, etc.;
- Author — filters items according to their author. The order depends on the author ID. As an example, admin ID is “1”, and editor ID is “2”, so the posts made by admin will be shown first;
- Title — filters post titles by alphabetical order. In the list of countries, Argentina will be the first one, followed by Belgium, Canada, etc.;
- Name — shows posts depending on their slug. For instance, the “apple-pie” will go before the “banana-bread”;
- Type — displays posts by the post types. That means if you have several post types injected in the Listing Grid, the posts will be filtered depending on the post type they belong to;
- Date — shows posts by the date they were published. So, if one post was published on 02/20/2021 and the other on 03/15/2021, the one posted in February will be located before the one posted in March;
- Modified — sets posts by the date they were modified. For instance, if the “Best TV Shows” was modified on 02/15/2022, while the “Oscar Nominees” was lastly edited on 02/16/2022, the “Best TV Shows” will be displayed before “Oscar Nominees”;
- Parent — places posts depending on their parent post’s date of creation. That means the post which parent was created earlier than the other posts will be displayed first. By the parent, the Parent Page is meant. It should be edited right in the post editor under the Page Attributes tab, only when the Hierarchical toggle and “Page Attributes” Supports feature are activated in the Advanced Settings tab of the post type you want to edit;
- Random — displays posts in a random order each time the page reloads;
- Comment count — filter works by the number of comments left under the post. That’s why the post with one comment will take the first place in the grid, and those whose audience left two or more comments will follow;
- Relevance — shows posts by the search relevance, in the following order: posts with matching sentences; all search terms in the post title; any words from the search query in the post title; full sentence found in the post’s content. Mind that search should be placed on the page for the correct work of this feature. For instance, Search Filter by JetSmartFilters;
- Menu order — sets posts in a specific order determined in the Order field, available during the post editing. So, the posts which order is defined as “0” are to be shown first; after that, the post with the “1” order proceeds, then “2”, etc. Mind that the Order field appears only when the “Page Attributes” option is selected as Supports in the Advanced Settings tab of the post type editor;
- Meta value — allows you to define the meta value by which you can filter posts. If we write ‘_pricing’ meta value in the Meta key for order field, the first option we’ll get is a tour with a $150 price, the following will cost $180, and the third can be bought for $200 already;
- Meta clause — displays posts depending on the meta clause. It works in cooperation with the “Meta Query” type. So, set the needed “Meta Query” and paste its Meta Query Clause value into the Meta clause to order field of the “Order & Offset” query;
- Preserve post ID order given in the “Include posts by IDs” option — works if you have also added the Posts & Author Parameters Query with some IDs pasted in the Include posts by IDs field. For example, if we write “340, 723, 620” post IDs in the mentioned field, we will get posts right in this order. Without the current Order by option, we would see the “340, 620, 723” posts order in the grid as they would be displayed in numerical order.
Tax Query
This type of query works with taxonomies and can help you sort the posts in the grid according to the categories you create for them.
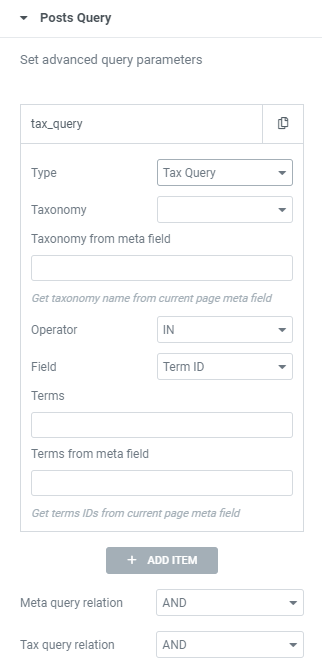
- Taxonomy — in this drop-down menu, you can select the type of taxonomy applied to the posts. All available taxonomies will be listed there;
- Taxonomy from meta field — if you have a meta field where you type in the taxonomy name, you can use it here. The value of the meta field will be used as a taxonomy for query;
- Operator — this field defines how different terms will work together. IN operator shows all the values in the chosen taxonomy. NOT IN hides all the items that are applied to the selected term. AND operator allows the existence of multiple conditions. EXIST is used to test the existence of any record in a subquery. NOT EXIST performs the opposed action;
- Field — here, you can choose how to display the terms: by Term ID, Slug, or Name. If you’ve selected the Term ID, you should fill in the Terms field with the macro %current_terms% to display the posts with the same terms as the main one on the page. To add more terms to the current ones, you can simply enter the needed IDs separating them with a comma;
- Terms — according to what you have chosen in the Field menu, here you have to type in the ID, slug, or name of the needed term;
- Terms from meta field — if you have the meta field where you put the terms data, you can use it to set the term dynamically.
Meta Query
With the help of this query type, you can display in the grid only those posts that have a similar (or not similar; it depends on the Operator) value to the one you’ve chosen.
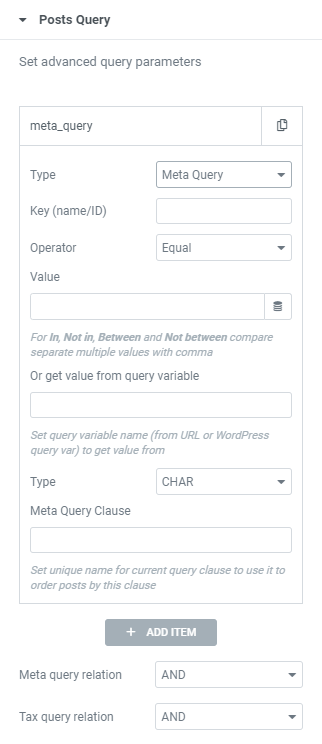
- Key (name/ID) — here, you need to enter the ID or name of the Meta Field. The value of that meta field will be compared to the one you set;
- Operator — this field defines how the values will be compared:
- Equal — displays posts having an equal value;
- Not Equal — shows posts that don’t have an equal value;
- Greater than — shows posts that have a greater value. It works with numeric values only;
- Greater or equal — displays posts that have a greater or equal value. It also works only for numeric values;
- Less than — shows posts that have a lesser value. For numeric values only;
- Equal or less — displays posts that have a lesser or equal numeric value;
- Like — shows posts that have the value you set in the Value field mentioned in the content;
- Not like — displays only the posts that don’t have the value you’ve set in the Value field mentioned in the content;
- In — after you add several values to the Value field, it shows the posts that have at least one of them in their content;
- Not in — displays posts that have any values except the ones you typed into the Value field;
- Between — displays posts that contain the value between two, which are set in the Value field;
- Not between — shows all the posts except the ones that contain a value that matches the set interval;
- Exist — shows all the posts that contain the Key. You don’t need to set the Value in this case;
- Not exist — displays all the posts that don’t contain the Key. You don’t need to set the Value either.
- Value — the value you’ll type in here will be compared with the values in the Key meta field;
- Or get value from query variable — this field allows you to take the value from the URL. Just paste the URL to the field and choose the Operator;
- Type — in this drop-down menu, you can choose the type of the Meta Query Clause;
- Meta Query Clause — after you type in the unique name here and hit the “Update” button, the clause you’ve just created will become available in the Order & Offset query. This way, you can order the posts according to a custom clause.
Date Query
If you want to sort the posts according to the date, this query type can help you.
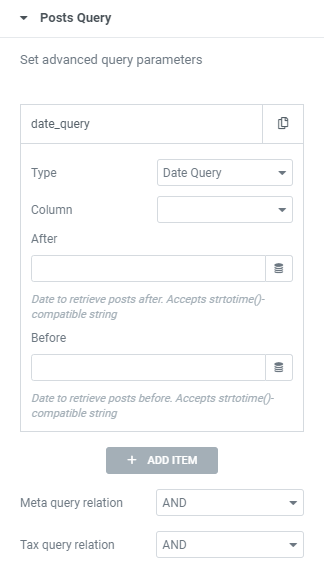
- Column — in this drop-down menu, you can choose the type of date you want to use. It could be the date of post creation or modification;
- After — if you set a date here, only the posts created or modified after that date will be shown;
- Before — with the help of this field, you can make the grid display only the posts that were created or modified before the date you set.
That is all for the Posts Query settings section of the Listing Grid widget. You now know how to use this functionality to sort the posts.